
Uncoupling HP cartridge simple mean to dismantle it, to pieces it, to separate all components from one another, this process is usually needed when the cartridge need to be refilled, or one or two of the components/parts need to be replaced, in some cases, we uncouple the cartridge to just troubleshoot it, and couple it back just maybe it will work better afterwards.
Uncoupling the cartridge can be a very delicate job, so you might have to read the whole article if you are uncoupling a cartridge for the first time.
Step 1: Prepare Your Workspace
Before anything, I love to uncouple cartridge in a place that is free from loads, somewhere there is nothing except the table I will be working on.
So in this case, prepare the place you will be uncoupling the cartridge and make sure there is nothing there except you tools, the cartridge you want to uncouple and maybe your toner if you are refilling, if you are refilling, properly set the toner to one side where you cant mistakenly hit it of bump into it, confirm you are putting the right toner in the right cartridge and then go to the next step.
Step 2: Power Off Your Printer
Before starting to uncouple I’d like to confirm that the printer is working perfectly fine in the printer except what I want to fix in it, I will make sure the printer is working fine too, then I will switch on the printer, let it boot till it shows ‘ready’ and then off it again.
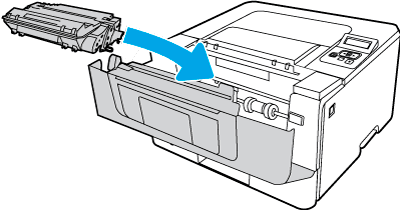
Step 3: Open the Printer Front / Access Door
The next step is to locate the front door or the top door, usually the door to be opened to access the cartridge, gently open the door to access the cartridge, most times the access door triggers the cartridge, in this case you must gentle deal with the access door.
Step 4: Identify the Cartridges
Hp printers uses different types of cartridge and some cartridge uses more than one cartridge, so you will have to be able to identify the one you need to fix or troubleshoot, in some cases, the you must be able to know more about the cartridge you are working so that you will be able to recognize the components you are about to change, but if you are very sure they will sell to you the exact part or component of the printer, then you are good to go.
Step 5: Release and Remove the Cartridges
After identifying the cartridge , then the next thing is to remove the cartridge, please make sure always dealing with the cartridge very gentle, you need your composure 100% of times you are dealing with cartridge, don’t shake, don’t be scare, don’t let anything fall from your hands, handle with care, and make you whatever you remove is fixed back exactly how it was and with perfect sides as it was.
Step 7: Uncoupling the Cartridges
This is where the real deal is, the HP cartridge is usually the same, I mean all of the HP printer cartridges, from the smallest to the biggest, if they will be different, there will be very little to no difference.
Below are 2 of the most important and delicate parts of the cartridge you will have to look out for in the cartridge.
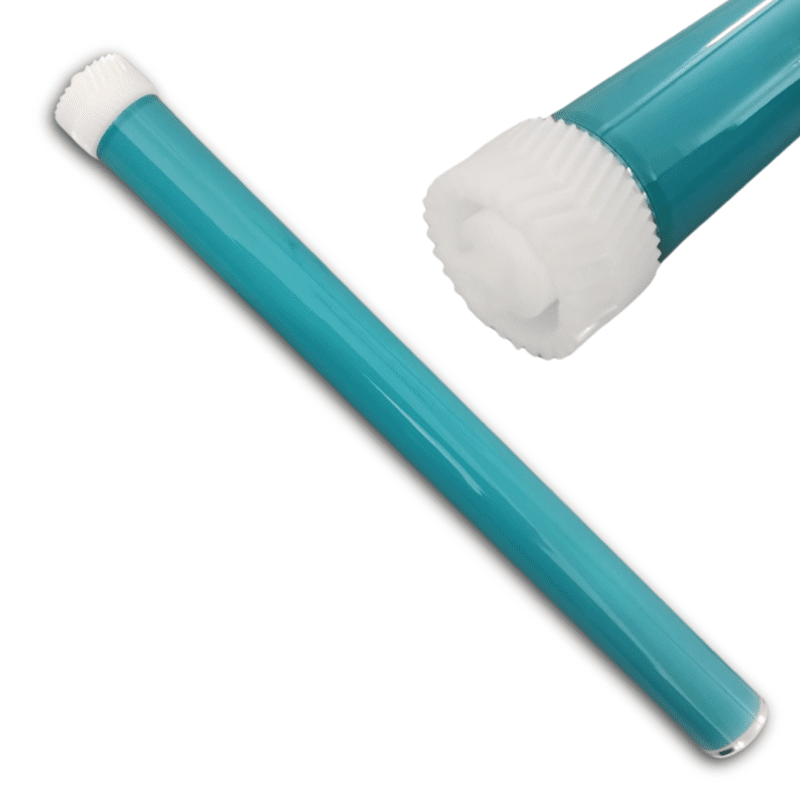
i. Drum
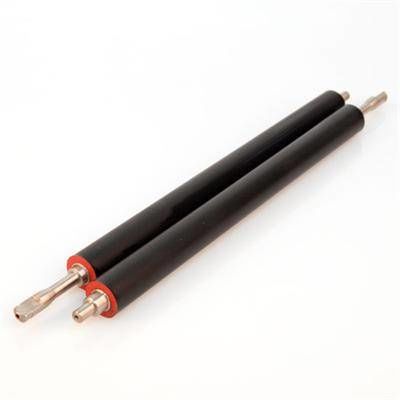
ii. Pressure Roller
The first component above is extremely delicate and must not fall from your hand, guess what? It is the first component you will come across when uncoupling the cartridge. Lol
Firstly, remove the drum and place it somewhere safe, your next step depends on what you want to do with the cartridge
HOW TO CLEAN THE WASTE TONER IN HP CARTRIDGE.
The steps below is usually needed when the printer is printing unwanted black or coloured line in the printed document.
1. After releasing the screws holding the cartridge together, it might be hook sometime, and can be pin, whatever it is, make sure to carefully release it first then you will be having two parts of the cartridge in your hands
2. Remove the drum.
3. Remove the pressure roller; the black long roller under the drum is the pressure roller
4. Then remove the waste toner under the pressure roller at times you might need the remove the cleaning blade that is under the pressure roller, but in most cases this is not needed.
HOW TO REFILL ALL HP CARTRIDGE.
1. After releasing the hook or pin holding the cartridge together as mentioned in (i) above.
2. Remove the drum just the same way you removed it when removing the waste toner as (ii) above.
3. Remove the magnetic roller: this is the roller that carries the toner from tank to drum and then to the paper.
4. You must have seen where toner is, just put more toner in the tank and couple back the cartridge.


")
